Getting Started with Zoom
Before using Zoom, you must install the Zoom software for your device. Start by going to the Zoom Download Center. Download both Zoom client for meetings and Zoom plugin for Microsoft Outlook.
Starting a Test Meeting
You can join a test Zoom meeting to familiarize yourself with Zoom and test your microphone/speakers before joining a Zoom meeting. Visit zoom.us/test and click Join.
Cheat Sheet (Insert cheat sheet)
- Sign in Zoom.com.
- Click Meetings.
- Click Schedule a Meeting.
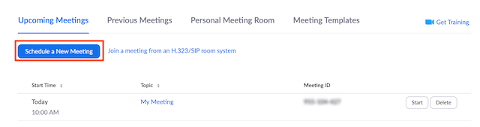
- Choose the date and time for your meeting.
- (Optional) Select any other settings you would like to use.
- Click Save.
Required:
- Microsoft Outlook 2016
- Download Zoom App
- Download Microsoft Outlook Plugin
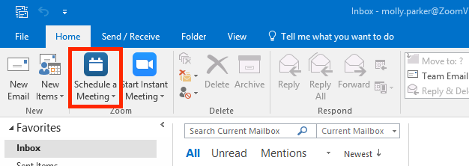
- Click the Schedule a Meeting Zoom button.
- Select your desired settings for scheduling a meeting.
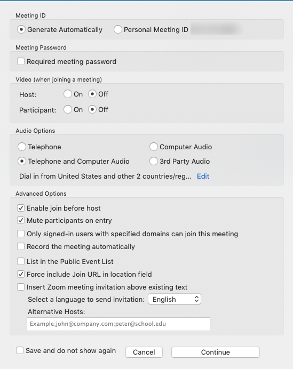
- Click Continue.
The calendar invitation will automatically generate with the Zoom meeting information.
- Enter the subject, date and time. Edit the email with instructions, as desired. The last step is to enter email addresses in the "to field"
- Click Send to email the invitation
- Select the calendar and locate the appointment
- Select cancel meeting on the top left corner of the meeting invitation.
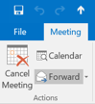
- Select send cancellation to update meeting attendees.

To Add a Virtual Background
- Save the desired image then sign in to Zoom.com
- Click Settings and select virtual background.
- Next, open the Zoom App and select the gear (settings), located on the top right.
- Select Virtual Background and click on the + sign to select your saved virtual image.
- If prompted, click Download to download the package for virtual background without a green screen.
Manage Participants During a Meeting
- Select Manage Participants
- Hover mouse over participant name
- Select More
- To stop participant video, select Stop Video
- To rename participant, select Rename, type name
- To remove participant from meeting, select Remove. Participant will not be able to rejoin after being removed from meeting
- To place participant in a waiting room, select Put in Waiting Room.
The Waiting Room feature allows the host to control when a participant joins the meeting.
As the meeting host, you can admit attendees one by one or hold all attendees in the waiting room and admit them all at once.
Participants will see the following screen when joining a meeting with Waiting Room enabled:
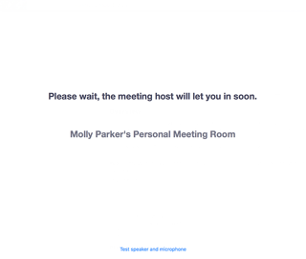
You can also customize the waiting room screen with your own logo, title and description.
Note: If the Waiting Room option is enabled, Join Before Host will not work for that meeting.
To Use Waiting Room
- Sign in to Zoom.com and click on Settings.
- Select In Meeting (advanced).
- Select Waiting Room to enable this option.
- All meeting participants will be placed in a waiting room until the host selects Admit or Admit All.
Breakout rooms allow you to split your Zoom meeting in up to 50 separate sessions. The meeting host can choose to split the participants of the meeting into these separate sessions automatically or manually, and can switch between sessions at any time.
Enable breakout room in Settings on Zoom.com
Limitations
Users joined into the Zoom meeting from the Zoom Mobile App devices can participate in breakout rooms, but cannot manage them.
Users joined using Chromebooks/Chrome OS or Zoom Rooms are unable to join breakout Rooms, but the main room can be used as an alternative session for these users.
If the meeting is being cloud recorded, it will only record the main room, regardless of what room the meeting host is in.
Creating Breakout Rooms
Note: You can also pre-assign participants to breakout rooms when you schedule the meeting instead of managing them during the meeting.
- Click Breakout Rooms.

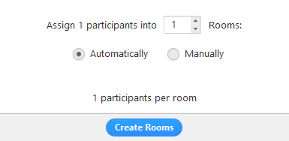
- Select the number of rooms you would like to create, and how you would like to assign your participants to those rooms:
- Automatically: Let Zoom split your participants up evenly into each of the rooms.
- Manually: Choose which participants you would like in each room.
- Click Create Breakout Rooms.
- Your rooms will be created, but will not start automatically. You can manage the rooms prior to starting them by following the instructions below.
Options for Breakout Rooms
- After creating the breakout rooms, click Options to view additional breakout rooms options.

- Check any options that you would like to use for your breakout rooms.
- Move all participants into breakout rooms automatically: Checking this option will move all participants into the breakout rooms automatically. If this option is unchecked, the participants will need to click Join to be added to the breakout room.
- Allow participants to return to the main session at any time: If this option is checked, the participants can move back to the main session from their meeting controls. If this is disabled, they need to wait for the host to end the breakout rooms.
- Breakout rooms close automatically after x minutes: If this option is checked, the breakout rooms will automatically end after the configured time.
- Notify me when the time is up: If this option is checked, the host will be notified when the breakout room time is up.
- Countdown after closing breakout rooms: If this option is checked, the participants will be given a countdown of how much time they have left before being returned to the main room.
- Follow the steps below to assign participants to rooms or click Open All Rooms to start the breakout rooms.
Assigning participants to rooms
To assign participants to your rooms, select Assign next to the room you wish to assign participants to and select participants you want to assign to that room. Repeat this for each room.

Once a participant has been assigned (manually or automatically), the number of participants will show in place of the Assign button.

Preparing Beakout Rooms
After manually or automatically assigning participants to rooms, you can rearrange the participants. Participants who are not assigned to breakout sessions will remain in the main meeting when the rooms are started.
- Move to (participant): Select a room to move the participant to. IMAGE
- Exchange (participant): Select a participant in another room to swap the selected participant with.
- Delete Room: Delete the selected room.
- Recreate: Deletes existing breakout rooms and creates new ones.
- Add a Room: Add another breakout room.
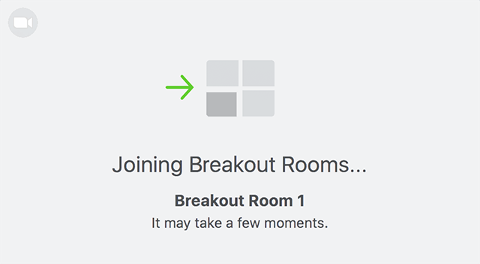
- Open All Rooms: Start the rooms. All participants will be moved to their respective rooms after confirming the prompt to join the breakout room. The host will be left in the main meeting until manually joining one of the rooms. The participants (and the host when manually joining a room) will see the following message shown when joining the breakout room.
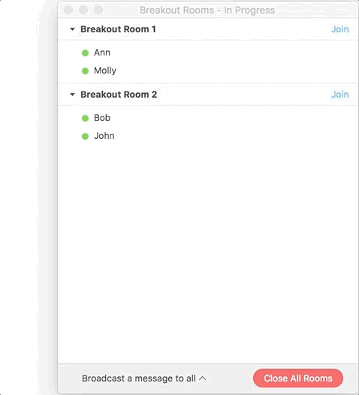
Managing Breakout Rooms in Progress
Once the breakout rooms have been started, the participants will be asked to join the Breakout Session. The host will stay in the main meeting until joining a session manually. If a participant has not joined the session yet, it will be noted by (not joined) next to their name.
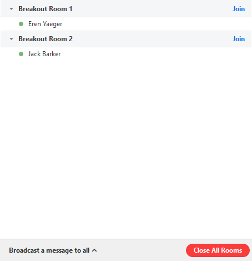
- Join: Join the breakout room.
- Leave: Leave the room and return to the main meeting (only shows when in a breakout room).
- Close All Rooms: Stops all rooms after a 60 second countdown, shown to the host and participants, and returns all participants back to the main meeting.
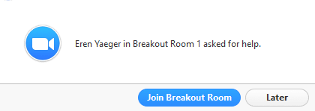
Responding to Requests for Help
Participants in breakout rooms can request that the meeting host join their meeting by clicking Ask for Help.
You will be prompted to join the room where the request originated from. Click Join breakout room to join the room.
Broadcasting a Message to All Breakout Rooms
The host can broadcast a message to all breakout rooms to share information with all participants.
- Click breakout rooms in the meeting controls.

- Click Broadcast a message to all, enter your message and click Broadcast.
- The message will now appear for all participants in Breakout Rooms.

Video Resources
Scheduling a Meeting on the Web Portal
Scheduling a meeting in Outlook
Host and Co-Host Meeting Controls
Joining and Configuring Audio and Video